Skip to content

#TuesdayTutorial: Determining Your Course Grade

#TuesdayTutorial: Determining Your Course Grade published on

In your final exam, you will write a self-evaluation that tells me what grade you deserve in the course. In the workplace, this process would be similar to asking for a raise or some additional perk during your annual review.

You’ll determine the course grade you deserve by returning to the syllabus and requirements page on this site. First, remember that your grades in this course are based 100% on the labor you actively contributed to building and supporting the writing community and the labor you put into completing all the activities and projects in the course. In your final exam, you will present the details on what you have done and avoid making excuses or telling “sob stories.”

Remember that the Grades in Canvas are only a summary of the work that you completed (or did not complete). Your grade is based on your work as outlined on the requirements page.

To Earn a B

Paper Graded B
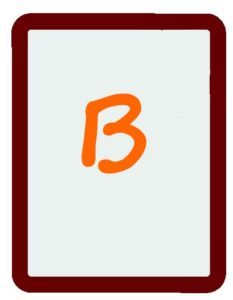
You must have completed the following activities in order to earn a B or higher in this course:

To Earn a Grade Lower than a B

If you did not complete all of the activities in the section above, your grade will be lower than a B. Discuss the required work that you did complete, explaining how much of it your completed. You can also refer to any work that you did beyond the basic requirements.

In your final exam, tell me what grade you deserve in the course (B-, C+, D, etc.), using the information from your performance evaluation to support your argument.

To Earn a Grade Higher than a B

Paper Graded AYou must have taken an ongoing leadership role by helping to teach the class new things and significantly adding support to the writing community.

Your contributions may have been supportive actions that you designed yourself (with feedback from me) or actions that came from a list of possible suggestions.

Be sure to talk about consistency. Your argument is stronger if you demonstrate that you consistently worked toward your goal during the entire term.

Grades higher than a B are earned based on a traditional bell curve: Those students who contributed most significantly will earn an A; those who contributed least significantly will earn a B+. Note that your grade is not based on the number of contributions, but on the value of those contributions to demonstrating your leadership and adding support to the writing community.

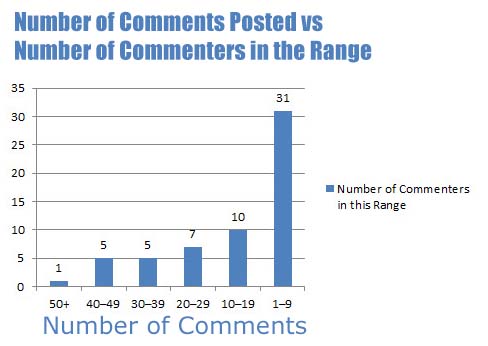
As of 12/02, the highest number of comments by a person is 54. The lowest number is 1.

Number of comments versus number of commenters in that range

 FAQ for Grades in the Course

If you are looking for… Look here…
The basic requirements for grades in the course Requirements Page
Options for earning a grade higher than a B Section on higher grades on the Requirements Page
Information on the check and X marks in Canvas Grades Completes vs. Incompletes section on How Canvas Grades Work Page
How to tell how you’re doing in the course How to Tell How You’re Doing section on the How Canvas Grades Work Page
The reason Canvas isn’t tracking your course grade What Is Tracked in Canvas Grades on the How Canvas Grades Work Page
Details on how to make your case for a grade in the course Final Exam Page


#TuesdayTutorial: Citing Your Sources

#TuesdayTutorial: Citing Your Sources published on

You need to provide in-text citations and bibliographic citations in your Genre Analysis Report, so this week’s #TuesdayTutorial reviews How to identify and credit sources (6m 32s).

Screenshot of Lynda.com session, How to identify and credit sources

In your Genre Analysis Report, you can use whatever bibliographical format you are most familiar with. Here are some tools if you are unsure how to make correct citations:

You can also watch the Lynda.com information on Citing Sources in research papers for more specific examples of citations.


Note: This video has closed captioning, so it does not need a transcript.


#TuesdayTutorial: Good-News Messages

#TuesdayTutorial: Good-News Messages published on

This week, the daily posts focus on correspondence in general. You will find posts that apply to letters, memos, and email messages—all of which you write in the workplace. Since none of the course projects focuses on correspondence, these posts will cover this important topic.

Today’s #TuesdayTutorial looks at the kind of correspondence most people enjoy working on: Writing An Effective Good-News Message (1m21s). Good-news messages are usually easy to write. At worst, your reader may be neutral about the information that you are sharing. In many situations, your reader may be pleased or even overjoyed, which makes your job as the writer simpler.

Even though they are easier, good-news messages do require a specific organization. Most importantly, you want to be sure that you don’t bury your good news. Put it right up front!

Watch today’s video to learn about the organization of a good-news message, all in just a bit over one minute:


#TuesdayTutorial: Email Tips for the Workplace

#TuesdayTutorial: Email Tips for the Workplace published on

This week, the daily posts focus on advice and strategies for writing effective email messages. You will find that writing email that is clear, concise, and engaging is critical to your success in the workplace. Since none of the course projects focuses on email, these posts will cover this important topic.

For today’s #TuesdayTutorial, I have a collection of 27 email templates, broken into the categories of networking, management, in the office, and the job search. Additionally, I found a list of templates for 8 Sticky Situations You’ll Come Across in Your Career. There is some overlap between the two pieces, but that just gives you more options.

As you use these great collections, keep these things in mind:

  • Read through all of the titles to find the best one for your situation. Some of the templates could apply to other categories.
  • Be careful with templates. Readers can frequently tell when you use a template, so use the tempates as a guide for what to write. Don’t just copy, paste, and send.
  • Make changes to the template you want to use by personalizing the message for your situation and reader.

As a bonus, I also have some tips on how to sign your email messages. You’re bound to find something useful in this list of 70 Different Email Sign-offs (for When You’re Sick of Saying "Best"). If you don’t have time to read through the whole list right now, the 60-second video below provides some quick, general options:

Note: This video needs a text-based transcript. While the video has no audio recording of text, a screenreader would not be able to read the text in the video. See the Optional Accessibility Transcript Activity for more details.


#TuesdayTutorial: Progress Reports for Clients and Stakeholders

#TuesdayTutorial: Progress Reports for Clients and Stakeholders published on

Lynda.com Login Help

Lynda.com videos are free to Virginia Tech students with your VT.EDU login. Start at the VT.EDU login page to access these resources.

On Monday, you will submit an internal progress report. It’s similar to the kind of progress report that you might give to your manager or co-workers to let them know what’s happening with a project.

You also need to know about how to write external progress reports, which will go to clients or stakeholders outside your organization. While the general purpose is the same as that for an internal progress report, the audience is quite different.

The Lynda.com video Using in-progress reports to communicate with clients (4m 23s) will walk you through the key features and the important characteristics of this kind of progress report.

Screenshot from #TuesdayTutorial: Progress Reports for Clients and Stakeholders


Note: This video has closed captioning, so it does not need a transcript.


#TuesdayTutorial: Conducting Research for Your Report

#TuesdayTutorial: Conducting Research for Your Report published on

Lynda.com Login Help

Lynda.com videos are free to Virginia Tech students with your VT.EDU login. Start at the VT.EDU login page to access these resources.

I’m sure you have done many research projects during your time as a student. Starting back in elementary school, you were asked to find outside sources and use them to create a project about your topic. Essentially that is your task for the Genre Analysis Report.

To review what goes into conducting research, watch the Lynda.com video on Conducting Research to Collect Information.

After you watch the video, consider the specific list of sources in the discussion of primary and secondary research, and describe how you can find or conduct one or more kind of research mentioned in the video.

Screenshot from the Lynda.com course Conduct Research to Collect Information

Note: This video has closed captioning, so it does not need a transcript.


#TuesdayTutorial: Using Lists to Organize Information

#TuesdayTutorial: Using Lists to Organize Information published on

Today’s #TuesdayTutorial focuses on how organizing information in your professional writing by using lists. Bullet lists and numbered lists make related information easy to read through, and because they are offset from the margins, lists stand out and catch the reader’s eye. Consider this example of a text written in a paragraph:

How To Fill Out Form I-765

Type or print legibly in black ink. If extra space is needed to complete any item, attach a continuation sheet, write your name and Alien Registration Number (A-Number) (if any), at the top of each sheet of paper, indicate the Part and item number to which your answer refers, and date and sign each sheet. Answer all questions fully and accurately. State that an item is not applicable with “N/A.” If the answer is none, write “None.”

—From Instructions for Application for Employment Authorization,
Department of Homeland Security

You can read through the information, but it could be better with the right formatting. Compare the paragraph version above to this revision, which uses numbered lists:

How To Fill Out Form I-765

  1. Type or print legibly in black ink.
  2. If extra space is needed to complete any item
    1. Attach a continuation sheet
    2. Write your name and Alien Registration Number (A-Number) (if any), at the top of each sheet of paper
    3. Indicate the Part and item number to which your answer refers,
    4. Date and sign each sheet.
  3. Answer all questions fully and accurately. State that an item is not applicable with “N/A.” If the answer is none, write “None.”

It should be immediately obvious that the version with the lists is easier to read. It provides a structure that works well with the F-shaped reading pattern.

I have two resources that you should read to learn more about using lists:

  1. Read all four pages of Grammar Girl’s Formatting Vertical Lists (or listen to the podcast). The information will tell you when to use a colon with a list, whether to capitalize list items. how to use other punctuation, and why list items should be parallel.
  2. Read Bulleted & Numbered Lists from the University of Minnesota’s Accessible U. This resource will tell you how to format your lists so that they work well with screenreaders and other assistive technologies.


#TuesdayTutorial: What to Include in Your Proposal

#TuesdayTutorial: What to Include in Your Proposal published on

Lynda.com Login Help

Lynda.com videos are free to Virginia Tech students with your VT.EDU login. Start at the VT.EDU login page to access these resources.

For your #TuesdayTutorial, I’m sharing a series of videos on Lynda.com that goes over the different parts that go into a proposal. Altogether, the videos will take 28m53s of your time. The videos includes all of the following:

  • Overview of proposal parts (4m40s)
  • Prefatory parts (5m28s)
  • Body parts (5m7s)
  • Ending parts (4m31s)
  • Appended parts (4m22s)
  • Visuals (4m45s)

Log in to see the video. A preview is below:


Writing a Proposal
by Judy Steiner-Williams


#TuesdayTutorial: Proposal Overview

#TuesdayTutorial: Proposal Overview published on

Lynda.com Login Help

Lynda.com videos are free to Virginia Tech students with your VT.EDU login. Start at the VT.EDU login page to access these resources.

The posts this week provide more information about proposals. Some of the information, like today’s tutorial, include information that expands beyond the basic details you need to write your short proposal for this class. Since you are likely to write more than one kind of proposal once you enter the workforce, today’s thorough details are sure to come in handy

This week’s #Tuesday Tutorial, the Lynda.com video Overview of Business Proposals (5m25s), introduces the four different types of proposals and goes on to discuss common proposal characteristics such as document structure, the necessary length, and audience needs.

As you watch the video, consider how the information relates to the short proposal that you will write. Since you will write about different kind of writing and for different reasons, how can you apply the information the video shares? If you have experience writing proposals in the workplace or elsewhere, how does your experience match the information in the video?

Screenshot of the opening screen of the Lynda.com video Overview of Business Proposals


Note: This video has closed captioning, so it does not need a transcript.


#TuesdayTutorial: Avoid Centered Text

#TuesdayTutorial: Avoid Centered Text published on

Zig Zag Reading Pattern Caused by Centered TextLast week, I shared design tips that you can use to improve your Analysis table. This week, I am going to share several posts that address proofreading and formatting changes that will make your project even better.

Reading Patterns and Centered Text

Today’s #TuesdayTutorial focuses on the alignment of the text in your document. Remember the #FridayFact in September that explained the F-shaped reading pattern? That idea comes into play with the tip to avoid centered text alignment in your documents.

When you center text, the left margin zig zags back and forth down the page, which makes it hard to read in the F-shaped pattern that people prefer.

Instead of skimming down the left margin to look for the highlights and headings, the eye has to search back and forth for the information on the page, as shown in the image on the right.

Learn More

Watch the following Lynda.com tutorial video, Favor flush-left, ragged-right body text (4m14s), for additional explanations and tips on this important guideline for the way that text is aligned on a page. Remember that Lynda.com videos are free to Virginia Tech students with your VT.EDU login. Start at the VT.EDU login page to access these resources.

Screenshot of the Lynda.com video Favor flush-left, ragged-right body text

Note: This video has closed captioning, so it does not need a transcript.


Primary Sidebar